


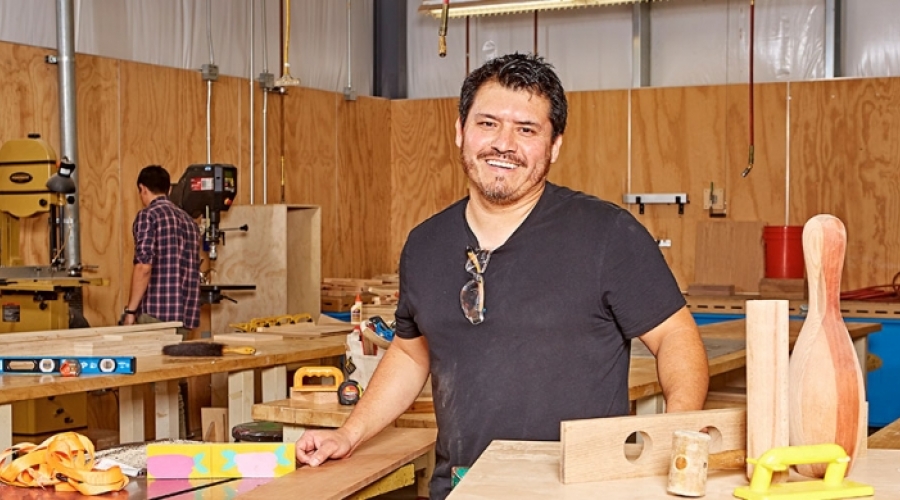
Andrew Armstrong can often be seen tinkering with tools, fabricating parts, or wiping grease off his hands after fixing one of the many machines at Otis College of Art and Design. “I always say I’m the dirtiest director on campus,” he says with a laugh. As the Director of Technical Support Services, Andrew oversees all of Otis College’s labs, from the printmaking and photo labs to the ceramic and sculpture studios.
But the pièce de résistance is the 5,300 square foot woodshop and metal shop. “That’s where most of the toys that I like to play around with are,” he says. It’s also where he teaches Machine Woodworking, which covers lumber, wood joinery, tool usage, and woodworking techniques, and gives students the opportunity to design and create a custom project—it’s one of the most popular courses in the Extension program. “I think a very small part of it has to do with me,” Andrew says modestly. “A larger part of it is the culture that we are living in, of the do-it-yourself maker. [There is] a resurgence of craft and artisanship.”
Every maker has an indispensable tool that makes their making possible. In Andrew’s case, he’s got a whole shop full of them. But we asked him to pick a few of his favorites—tools he teaches his students how to use, to make their making possible too.
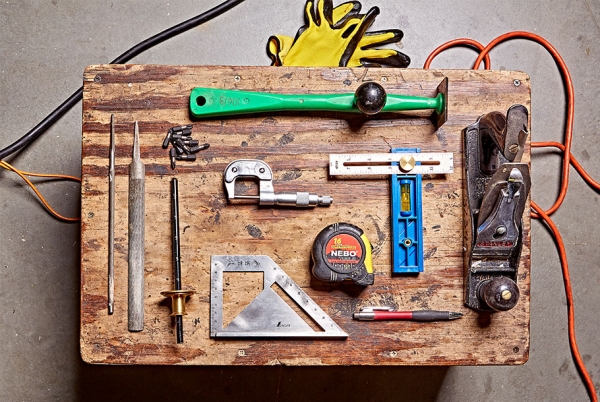
Clockwise from top:
- Glue scraper: “Used for scraping excess glue that seeps out during the clamping process.”
- Adjustable square: “Used for making sure things are 90 degrees. It has a level and can move it back and forth. And it has a ruled edge that allows you to measure as well.”
- Planer: “Used to shave down wood. It scrapes the surface to flatten and smooth.”
- Mechanical pencil: “We use this a lot in the shop because it keeps a really sharp point all the time, unlike a regular pencil that will go dull and have an inaccurate marking.”
- Tape measure: “Used for making measurements. We all know what that is.”
- Combination square: “This stainless steel square has a 45 degree and a 90 degree, and can sit on the edge of the material. Used for marking and for making sure things are the right angle.”
- Marking gauge: “I can move the shoulder up and down, and lock in the relationship between the shoulder and the bladed rolling marker. So if I need to make a measurement that is two inches, I lockdown at two inches and scribe it and see a scribed mark at 2 inches.”
- Caliper: “Used to measure the thickness of materials. I can read the dimensions on the graduated piece.”
- Files: Used for filing wood or metal, for the shaping and forming and final fitting of material.
- Standard No. 2 Phillips bits: They go into a drill bit and are used for putting in screws.
Andrew was already a maker when he came to Otis College where he received a BFA and MFA in fine arts. He became a campus lab tech before graduating and has been helping students learn their way around the labs ever since. “I think making and creativity is good for you mentally and emotionally.
I’m happiest and calmest and feel most in the zone when I’m making stuff,” he says. “There’s also something about being self-sufficient that I think is important for the self.”
Inspired to get in the shop yourself? Andrew is teaching Machine Woodworking for the Extension Winter/Spring session, see all upcoming workshops and courses.
Photo by Meiko Arquillos / Art Direction by Sheharazad Fleming